Tuesday, July 26, 2022

RP2040 Micropython PIO - Part 4 - Using IRQ to signal when pins changes have been pushed!

I'm delighted that this worked exactly as it seemed it ought to.  Just like we did in Part 3, we track the pins states and only push them when there's been a change.  But now, when we push the changed pins, we toggle the irq. 

When we initialize the state machine, we bind a function, "printFromGet" to the state machine irq. When the irq is toggled, this function is called, and a pointer to the state machine is passed to the function.  Then we can call sm.get() to read the new pins values.   This is fantastic because python doesn't need to spin checking the pins using the gpio library wasting cpu cycles.  When we press a key, python is detoured momentarily to our needed function to handle the pin press, and once it returns, python can resume whatever else it was working on!

Here's a more complete code from the last couple examples. 

import safety_pin
import pio_junk
from machine import Pin
import rp2
import time

COUNT = 0

def initPinsAsIn(direction=Pin.PULL_UP):
for n in range(32):
try:
Pin(n, Pin.IN, direction)
except:
print("Couldn't initialize pin:", n)

def printFromGet(sm):
global COUNT
out = sm.get()
print(f'{COUNT} - {out:>032b}')
COUNT += 1

@rp2.asm_pio( set_init=[PIO.IN_HIGH]*32 )
def irq_pins_changes():
mov(y, pins)
#in_(y, 32)
mov(isr, y)
push()

wrap_target()
label("read loop")
mov(x, pins)

jmp(x_not_y, "exit read loop")
jmp("read loop")
label("exit read loop")
mov(isr, x)
mov(y, x)
push()
irq(1)

wrap()

if __name__ == '__main__':
print('In Main Now')
initPinsAsIn()

sm = rp2.StateMachine(0, irq_pins_changes,
freq=2000, in_base=Pin(0))
sm.irq(printFromGet, 0)

sm.active(1)
for n in range(10):
out = sm.get()
print(f'{n}, {out:>032b}')
sm.active(0)

The last thing I might want to do is sort of look up which pin changed and push an integer value corresponding with the addr of the changed pin so each time I do a get() in python, I get the number of the changed pin.  
Monday, July 25, 2022

RP2040 Micropython PIO - Part 3 - Pushing pins only on changes

 In order to check for changes to the pins, each time we read the pins values, we can compare them to previous values stored in the x or y scratch registers. 

So the statemachine records the pin state in y when it starts, pushes y so python has the initial state as well, and then the state machine keeps checking the pins until the pin values cached in x aren't equal to y.  Then it pushes x, copies x to y, and starts checking again. 

for n in range(32):
try:
Pin(n, Pin.IN, Pin.PULL_UP)
except:
print("Couldn't initialize pin:", n)

@rp2.asm_pio( set_init=[PIO.IN_HIGH]*32 )
def echo_pins_changes():
mov(y, pins)
#in_(y, 32)
mov(isr, y)
push()

wrap_target()
label("read loop")
mov(x, pins)

jmp(x_not_y, "exit read loop")
jmp("read loop")
label("exit read loop")
mov(isr, x)
mov(y, x)
push()

wrap()

sm = rp2.StateMachine(0, pio_junk.echo_pins_changes,
freq=2000, in_base=Pin(0))

sm.active(1)
for n in range(10):
out = sm.get()
print(f'{n}, {out:>032b}')
sm.active(0)

Next step is setting an irq to tell python it's time to pull a value from the fifo.  

And maybe later some time, we can implement matrix scanning!  I'm not too sure how that would work since we'd need to potentially track the state of more than 32 keys...  maybe we'd use separate state machines for each row of the keyboard!

Sunday, July 24, 2022

RP2040 Micropython PIO - Part 2 - Reading all the pins!

 The next thing I wanted to get working with PIO was reading the pin values.   I struggled with this until I realized that I needed to initialize the pins and set them to pull_up before starting the state machine.  Anyway, here's an example reading all available pins and returning their states on the fifo:

@rp2.asm_pio( set_init=[PIO.IN_HIGH]*32 )
def echo_pins():
wrap_target()
in_(pins, 32)
push()

set(x, 31) # call nop 32 times to slow things down
label("aloop")
nop() [31]
jmp(x_dec, "aloop")

wrap()

for n in range(32): # Initialize all the pins with PULL_UP
try:
Pin(n, Pin.IN, Pin.PULL_UP)
except:
print("Couldn't initialize pin:", n)

sm = rp2.StateMachine(0, pio_junk.echo_pins,
freq=2000,
in_base=Pin(0))

sm.active(1)
for n in range(10): # pull pin states from the fifo ten times!
out = sm.get()
print(f'{n}, {out:>032b}')
sm.active(0)

And the output looks like the following.  Some of the bits change as I press keys on the keyboard:

>>>
MPY: soft reboot
Checking Safety Pin 25...
In Main Now
Couldn't initialize pin: 30
Couldn't initialize pin: 31
0, 00111110111111111111101111111011
1, 00111110111111111111101111111011
2, 00111110111111111111101111111011
3, 00111110111111111111101111111011
4, 00111110110101011111101101111011
5, 00111110110101011111101101111011
6, 00111110110101011111101101111011
7, 00111110111111111111101111111011
8, 00111110111111111111101111111011
9, 00111110110101011111101101111011
MicroPython v1.19.1 on 2022-06-18; Arduino Nano RP2040 Connect with RP2040
Type "help()" for more information.
>>>

In Part 3, we'll track the pin states and  only output a value when there is a change.  

And in Part 4, we'll use an irq to trigger a python function only when there is a key press event so we don't need to keep a cpu core busy watching for button presses. 

Saturday, July 23, 2022

RP2040 Micropython PIO - Part 1 - Blinking nop, jmp, and .side experiments!

 I'm working on incrementally adding complexity to PIO programs to learn how to use them.  Here are a few examples.  Note that I'm using Pin 6 for the LED on the Arduino Connect Nano RP2040 board.  I think the pin is different for the Pi Pico.

Most Simple Blinking the LED:

The most simple classic blinking example - toggle a pin on and off with the slowest freqency (2000) and a bunch of nop waits to slow the blinking down enough that we can see it!

@rp2.asm_pio(set_init=rp2.PIO.OUT_LOW)
def blink():
wrap_target()
set(pins, 1) [31]
nop() [31]
nop() [31]
nop() [31]
nop() [31]
set(pins, 0) [31]
nop() [31]
nop() [31]
nop() [31]
nop() [31]
wrap()

# sm = rp2.StateMachine(0, pio_junk.blink, freq=2000, set_base=Pin(6))
# sm.active(1)


Blinking the LED Using sideset and jmp for more nop:

In this example, we use sideset to toggle the LED pin on and off and jmp to loop for more nop.

Normally, in each PIO assembled instruction, 5 bits are available to specify length of wait, so 0-31 wait cycles.  But when we enable sideset, 2 (or more??) bits are used to specify the sideset value.  In this case, we use Pin 6 (the LED) as the sideset pin, and we have a max wait of 7 (three bits). 

This speeds up the program execution without a bunch more nop calls.  So we can count on the x scratch register to repeatedly call nop with a jmp and slow the blinking enough that we can see it, like before using sideset and the longer [31] wait.

@rp2.asm_pio(sideset_init=rp2.PIO.OUT_LOW)
def side_blink():
wrap_target()
set(x, 31).side(0x0)
label("aloop")
nop() [7]
jmp(x_dec, "aloop")

set(x, 31).side(0x1)
label("bloop")
nop() [7]
jmp(x_dec, "bloop")
wrap()

# sm = rp2.StateMachine(0, pio_junk.side_blink, freq=2000, sideset_base=Pin(6))
# sm.active(1)


Up next...

I'm trying to read the value of all of the pins and put the values into the fifo to be used by the Micropython program...

Micropython - Safety pin to avoid soft-bricking

 I ran into an issue on an Arduino Connect Nano RP2040 board this last week where I got some code in main.py that caused micropython to hang without functional serial or shared drive, so I had no way to change the code and fix it. 

It was a little difficult to fix this.  A few things I tried:

  • Re-flash the micropython uf2 - this doesn't wipe the main.py and other code, so the problem remains.
  • Flash circuitpython uf2 - circuitpython stores code at a different addr and works perfectly when flashed, but when you put micropython back, the old broken main.py remains.  I even tried to dd a large random data file to the circuitpython shared folder, but somehow it didn't overwrite the micropython content!
  • Flash the various nuke uf2 files - It seems that these are all set up for the pi pico, which has 4MB of storage.  The arduino board has 8MB of storage and the area micropython uses is unaffected. 
What did finally work!
  • Flash the OpenMV customized version of Micropython.  It didn't load the main.py and exposed the same memory/file share that micropython uses so I was able to rename the broken main.py and flash standard Micropython back onto the board to resume working on it!
  • https://github.com/openmv/openmv/
And how to avoid this in the first place - It's surprisingly easy to hang micropython when experimenting with PIO and other stuff with blocking functions. The solution I'm using now is to source a file that checks if a pin is grounded.  If it is, it calls sys.exit() so the program quits instead of continuing and triggering another hang. 

main.py:

import saftey_pin
...
...


safety_pin.py:

from machine import Pin
import time
import sys

PIN_NUM = 25
SAFETY_PIN = Pin(PIN_NUM, Pin.IN, Pin.PULL_UP)

print(f"Checking Safety Pin {PIN_NUM}...")
time.sleep(.1)
if not SAFETY_PIN.value():
    print("PIN Shorted to Ground!")
    print("Aborting loading and quitting.")
    sys.exit()


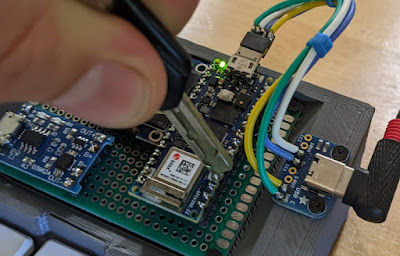
 To use it, I put a key between the two pins shown here and plug the board into the usb port:


Friday, July 08, 2022

Micropython - Keyboard library with chording, layers, etc.

 I'm working on a project to build an interacive terminal using micropython, and a component of that is checking for button presses and translating them to keys to be used to control the terminal or however that works.  

I've made a couple of attempts at keyboard firmwares in the past and changed strategies this time from key-focused to event-focused - events start when a key is pressed and terminate after either a hold timer or key that is part of the event is released.  

Based on the numbers of keys in the event, their functions, and hold duration, we can figure out the correct keyboard key to be returned.  

Examples to consider:

  • Chords can map combinations of keys to letters, numbers, or symbols,
  • A single key, if held for some duration, can trigger a layer shift and then subsequent keys or combinations of keys can result in letters, numbers, etc from that layer. 
  • Short taps result in a number, letter, etc. 
Anyway, this might be a helpful template for anyone trying to do something similar:

https://github.com/a8ksh4/MicroNote/blob/main/keeb.py